搜索到
32
篇与
的结果
-
 WordPress前端优化 html代码压缩 提高加载速度 将以下代码粘贴到 WordPress 主题目录下的 functions.php 文件的最后一个 ?> 之前即可//压缩html代码 function wp_compress_html(){ function wp_compress_html_main ($buffer){ $initial=strlen($buffer); $buffer=explode("<!--wp-compress-html-->", $buffer); $count=count ($buffer); for ($i = 0; $i <= $count; $i++){ if (stristr($buffer[$i], '<!--wp-compress-html no compression-->')) { $buffer[$i]=(str_replace("<!--wp-compress-html no compression-->", " ", $buffer[$i])); } else { $buffer[$i]=(str_replace("\t", " ", $buffer[$i])); $buffer[$i]=(str_replace("\n\n", "\n", $buffer[$i])); $buffer[$i]=(str_replace("\n", "", $buffer[$i])); $buffer[$i]=(str_replace("\r", "", $buffer[$i])); while (stristr($buffer[$i], ' ')) { $buffer[$i]=(str_replace(" ", " ", $buffer[$i])); } } $buffer_out.=$buffer[$i]; } $final=strlen($buffer_out); $savings=($initial-$final)/$initial*100; $savings=round($savings, 2); $buffer_out.="\n<!--压缩前的大小: $initial bytes; 压缩后的大小: $final bytes; 节约:$savings% -->"; return $buffer_out; } if ( !is_admin() ) { ob_start("wp_compress_html_main"); } } add_action('init', 'wp_compress_html'); 排除后台不压缩,只针对前台进行压缩,压缩生效的范围更大。绕过压缩注释<!--wp-compress-html--><!--wp-compress-html no compression--> 此处代码不会被压缩,主要是避免压缩带来的错误,比如JS错误 <!--wp-compress-html no compression--><!--wp-compress-html-->只有这样包裹代码,被包裹的代码才不会被压缩,网上分享的大部分方法都是无效的。一般可以把代码里的 script脚本 前后进行包括以免压缩后出错。如果博客使用了 Crayon Syntax Highlighter 高亮插件,那么启用代码压缩之后,你会发现在文章页面双击代码切换到纯文本模式时,会发现代码全挤在一团了!好吧,全都给压缩了。解决办法function unCompress($content) { if(preg_match_all('/(crayon-|<\/pre>)/i', $content, $matches)) { $content = '<!--wp-compress-html--><!--wp-compress-html no compression-->'.$content; $content.= '<!--wp-compress-html no compression--><!--wp-compress-html-->'; } return $content; } add_filter( "the_content", "unCompress");同理如果使用的是 pure highlightjs 高亮插件按下面方法修改即可function unCompress($content) { if(preg_match_all('/(pure-highlightjs|<\/pre>)/i', $content, $matches)) { $content = '<!--wp-compress-html--><!--wp-compress-html no compression-->'.$content; $content.= '<!--wp-compress-html no compression--><!--wp-compress-html-->'; } return $content; } add_filter( "the_content", "unCompress");
 -
WordPress提速优化篇:清理HEAD头部多余脚本 remove_action( 'wp_head', 'feed_links_extra', 3 ); //去除评论feed remove_action( 'wp_head', 'feed_links', 2 ); //去除文章feed remove_action( 'wp_head', 'rsd_link' ); //针对Blog的远程离线编辑器接口 remove_action( 'wp_head', 'wlwmanifest_link' ); //Windows Live Writer接口 remove_action( 'wp_head', 'index_rel_link' ); //移除当前页面的索引 remove_action( 'wp_head', 'parent_post_rel_link', 10, 0 ); //移除后面文章的url remove_action( 'wp_head', 'start_post_rel_link', 10, 0 ); //移除最开始文章的url remove_action( 'wp_head', 'wp_shortlink_wp_head', 10, 0 );//自动生成的短链接 remove_action( 'wp_head', 'adjacent_posts_rel_link', 10, 0 ); ///移除相邻文章的url remove_action( 'wp_head', 'wp_generator' ); // 移除版本号把脚本添加到FUNCTION.PHP(当前主题下)文件中,这样我们网站源代码中就移除掉没有必要的代码行,进而提高代码执行率和网站速度。remove_action( 'wp_head', 'wp_generator' ); //WordPress版本信息。 remove_action( 'wp_head', 'parent_post_rel_link' ); //最后文章的url remove_action( 'wp_head', 'start_post_rel_link' ); //最前文章的url remove_action( 'wp_head', 'adjacent_posts_rel_link' ); //上下 remove_action( 'wp_head', 'adjacent_posts_rel_link_wp_head');//上下文章的url remove_action( 'wp_head', 'feed_links_extra', 3 );//去除评论feed remove_action( 'wp_head', 'feed_links' ); //去除文章的feed remove_action( 'wp_head', 'rsd_link' ); //针对Blog的离线编辑器开放接口所使用 remove_action( 'wp_head', 'wlwmanifest_link' ); //如上 remove_action( 'wp_head', 'index_rel_link' ); //当前页面的url remove_action( 'wp_head', 'wp_shortlink_wp_head' ); //短地址 remove_action( 'wp_head', 'rel_canonical'); wp_deregister_script('l10n'); remove_filter( 'the_content', 'wptexturize'); //禁用半角符号自动转换为全角 remove_action( 'wp_head', array($wp_widget_factory->widgets['WP_Widget_Recent_Comments'], 'recent_comments_style')); remove_action( 'wp_head', 'wp_enqueue_scripts', 1 ); //Javascript的调用 remove_action( 'wp_head', 'feed_links', 2 ); //移除feed remove_action( 'wp_head', 'feed_links_extra', 3 ); //移除feed remove_action( 'wp_head', 'rsd_link' ); //移除离线编辑器开放接口 remove_action( 'wp_head', 'wlwmanifest_link' ); //移除离线编辑器开放接口 remove_action( 'wp_head', 'index_rel_link' );//去除本页唯一链接信息 remove_action('wp_head', 'parent_post_rel_link', 10, 0 );//清除前后文信息 remove_action('wp_head', 'start_post_rel_link', 10, 0 );//清除前后文信息 remove_action( 'wp_head', 'adjacent_posts_rel_link_wp_head', 10, 0 ); remove_action( 'wp_head', 'locale_stylesheet' ); remove_action('publish_future_post','check_and_publish_future_post',10, 1 ); remove_action( 'wp_head', 'noindex', 1 ); remove_action( 'wp_head', 'wp_print_styles', 8 );//载入css remove_action( 'wp_head', 'wp_print_head_scripts', 9 ); remove_action( 'wp_head', 'wp_generator' ); //移除WordPress版本 remove_action( 'wp_head', 'rel_canonical' ); remove_action( 'wp_footer', 'wp_print_footer_scripts' ); remove_action( 'wp_head', 'wp_shortlink_wp_head', 10, 0 ); remove_action( 'template_redirect', 'wp_shortlink_header', 11, 0 ); add_action('widgets_init', 'my_remove_recent_comments_style'); function my_remove_recent_comments_style() { global $wp_widget_factory; remove_action('wp_head', array($wp_widget_factory->widgets['WP_Widget_Recent_Comments'] ,'recent_comments_style')); } 加入到function.phpremove_action(‘wp_head’, ‘wp_generator’); remove_action(‘wp_head’, ‘wlwmanifest_link’); remove_action(‘wp_head’, ‘rsd_link’); 加入到head.php的wp_head();上一行 wp_deregister_script(“jquery”); 作用:1、wp-generator移除wordpress的版本号,本身blog的版本号没什么意义,但是如果让恶意玩家看到,可能会用官网公布的漏洞攻击blog2、wlwmanifest_link移除wlwmanifest相关信息3、rsd_link移除XML-RPC4、在wp_head();前边加上wp_deregister_script主要作用是去除默认调用的jquery,这个只能在头部文件使用注销默认的调用js文件。例子:wp_deregister_script(“jquery”);wp_head();去除之后,可以用google的jquery库,减少自身服务器的负担。方法:在head.php或footer.php文件中(本博在footer.php中)加入<script src=”http://ajax.googleapis.com/ajax/libs/jquery/1.4.2/jquery.min.js” type=”text/javascript”></script> 去除wordpress头部不必要的元素标签完整的wordpress头部清理代码<?php //remove_action( ‘wp_head’, ‘wp_enqueue_scripts’, 1 ); remove_action( ‘wp_head’, ‘feed_links’, 2 ); remove_action( ‘wp_head’, ‘feed_links_extra’, 3 ); remove_action( ‘wp_head’, ‘rsd_link’ ); remove_action( ‘wp_head’, ‘wlwmanifest_link’ ); remove_action( ‘wp_head’, ‘index_rel_link’ ); remove_action( ‘wp_head’, ‘parent_post_rel_link’, 10, 0 ); remove_action( ‘wp_head’, ‘start_post_rel_link’, 10, 0 ); remove_action( ‘wp_head’, ‘adjacent_posts_rel_link_wp_head’, 10, 0 ); //remove_action( ‘wp_head’, ‘locale_stylesheet’ ); remove_action( ‘publish_future_post’, ‘check_and_publish_future_post’, 10, 1 ); //remove_action( ‘wp_head’, ‘noindex’, 1 ); //remove_action( ‘wp_head’, ‘wp_print_styles’, 8 ); //remove_action( ‘wp_head’, ‘wp_print_head_scripts’, 9 ); remove_action( ‘wp_head’, ‘wp_generator’ ); //remove_action( ‘wp_head’, ‘rel_canonical’ ); remove_action( ‘wp_footer’, ‘wp_print_footer_scripts’ ); remove_action( ‘wp_head’, ‘wp_shortlink_wp_head’, 10, 0 ); remove_action( ‘template_redirect’, ‘wp_shortlink_header’, 11, 0 ); add_action(‘widgets_init’, ‘my_remove_recent_comments_style’); function my_remove_recent_comments_style() { global $wp_widget_factory; remove_action(‘wp_head’, array($wp_widget_factory->widgets['WP_Widget_Recent_Comments'], ‘recent_comments_style’)); } ?> 把这段代码插入到主题的functions.php文件下,就可以清除WordPress头部很多的冗余信息。下面说说这些代码的具体意义是什么,以免删除某些你想保留的功能。wp_head()函数wp_head()是wordpress的一个非常重要的函数,基本上所有的主题在header.php这个文件里都会使用到这个函数,而且很多插 件为了在header上加点东西也会用到wp_head(),比如SEO的相关插件。不过在wp_head()出现的这个位置,会增加很多并不常用的代 码,如何删除呢?可以通过remove_action移除这些代码。remove_action函数函数原型:remove_action( $tag, $function_to_add, $priority, $accepted_args ); 该函数移除一个附属于指定动作hook的函数。该方法可用来移除附属于特定动作hook的默认函数,并可能用其它函数取而代之。 重要:添加hook时的$function_to_remove 和$priority参数要能够相匹配,这样才可以移除hook。该原则也适用于过滤器和动作。移除失败时不进行警告提示。 参数 1.$tag(字符串)(必需)将要被删除的函数所连接到的动作hook。默认值:None 2.$function_to_remove(回调)(必需) 将要被删除函数的名称默认值:None 3.$priority(整数)(可选)函数优先级(在函数最初连接时定义)默认值:10 4.$accepted_args(整数)(必需)函数所接受参数的数量。默认值:1 返回值 (布尔值)函数是否被移除。 1.Ttue 函数被成功移除 2.False函数未被移除 移除WordPress版本信息在head区域,可以看到如下代码:<meta name="generator" content="WordPress 3.1.3" /> 这是隐性显示的WordPress版本信息,默认添加。可以被黑客利用,攻击特定版本的WordPress漏洞。清除代码:remove_action( ‘wp_head’, ‘wp_generator’ ); 移除离线编辑器开放接口WordPress自动添加两行离线编辑器的开放接口<link rel="EditURI" type="application/rsd+xml" title="RSD" href="http://example.com/xmlrpc.php?rsd" /> <link rel="wlwmanifest" type="application/wlwmanifest+xml" href="http://example.com/wp-includes/wlwmanifest.xml" /> 其中RSD是一个广义的接口,wlwmanifest是针对微软Live Writer编辑器的。如果你不需要离线编辑,可移除之。即便你需要使用离线编辑器,大部分时候也不需要这两行代码。Live Writer自己知道它们。保留这两行代码可能会留有安全隐患。清除代码:remove_action( ‘wp_head’, ‘rsd_link’ ); remove_action( ‘wp_head’, ‘wlwmanifest_link’ ); 移除前后文、第一篇文章、主页meta信息WordPress把前后文、第一篇文章和主页链接全放在meta中。我认为于SEO帮助不大,反使得头部信息巨大。移除代码:remove_action( ‘wp_head’, ‘index_rel_link’ ); // Removes the index link remove_action( ‘wp_head’, ‘parent_post_rel_link’, 10, 0 ); // Removes the prev link remove_action( ‘wp_head’, ‘start_post_rel_link’, 10, 0 ); // Removes the start link remove_action( ‘wp_head’, ‘adjacent_posts_rel_link_wp_head’, 10, 0 ); // Removes the relational links for the posts adjacent to the current post. 移除Canonical标记09年2月份,Google,Yahoo及Microsoft三大搜索引擎联合推出了一个旨在减少重复内容困扰的方法,这对于广大站长来说不啻是个好事情,不用再担心因为网站上有重复的内容而影响到网站页面的权重了。造成重复内容的原因有很多,最常见的便是多个url地址指向了同一个页面,比如:wordpress平台下的一篇日志页面,包括了文章及评论内容。 每个评论都可以有个固定的链接地址,,如果有多个评论的话,则每条评论的链接都类似于上述格式,只是commentID号有所不同,这些链接其实都是指向 同一篇文章的。蜘蛛来爬时,便会依次爬行一遍,这篇文章下如有10条评论,则爬了10次相同的页面文章,相当于做了多次重复的工作,严重影响了抓取的效 率,及耗费了带宽。重复内容造成的结果必然是蜘蛛不愿意来爬,不同的url指向同一个页面,也会影响到该页面的权重。通过canonical标签,能有效的避免这类问题。需要注意两点:1.允许指向不同的子域名,不允许指向其他域名 2.canonical属性可以被传递 即A页面声明B为权威链接,B声明C为权威网页,那么C就是A和B共同的首选权威版本如果你的WP版本在2.9之前,需要通过插件(上面已经提到)或者手工 Hack 主题的 header.php 文件来使得博客支持。<link rel="canonical" href="<?php get_permalink()?>" /> 在 WordPress 2.9 发布之后,WordPress 已经默认支持这一标签了,我们无需做任何动作,主题就支持这一标签。这对于文章固定链接的更改很有帮助,可以增加对搜索引擎的友好度。但是如果你觉得这个标签对你无用,也可以移除之:remove_action( ‘wp_head’, ‘rel_canonical’ ); 移除feedHTML中通过来指定博客feed。可以被浏览器检测到,然后被读者订阅。如果你不想添加feed,或者想使用烧制的feed(如FeedSky或者Feedburner烧制的feed),可以移除之。remove_action( ‘wp_head’, ‘feed_links’, 2 );//文章和评论feed remove_action( ‘wp_head’, ‘feed_links_extra’, 3 ); //分类等feed
-
Slider Revolution幻灯片插件优化指南 Slider Revolution是一个非常优秀和强大的wordpress插件,使用Slider Revolution插件可以实现在文章、页面、小工具以及页面任何地方调用预设的幻灯片。并且Slider Revolution插件做出来的幻灯片效果也是非常的炫酷,可以说是wordpress幻灯片的完美解决方案。鉴于这么优秀的一个插件,所以我们的主题中也是采用了这个插件来实现幻灯片功能的。但是这么强大的插件,肯定有很多地方是可以进行优化的,尤其是国内的网络环境。全局设置进入插件页面(wordpress后台左边菜单的Slider Revolution),右上角有一个全局设置,点开,然后设置如下:Include RevSlider libraries globally: 关闭 (取消全局加载,只在有幻灯片的页面加载)注意:关闭此项后需要Pages to include RevSlider libraries设置加载的页面,首页为homepage,其他页面为IDInsert JavaScript Into Footer: 打开 (将js静态资源放到页脚,加快页面显示)Defer JavaScript Loading: 打开 (js延迟加载)字体设置Slider Revolution是一个国外的插件,并且可以设置字体,但是字体很不幸的采用了谷歌的字体库,虽然用上面的全局设置或者插件可以替换字体连接,但是对于中文网站其实很少使用到这个字体的,所以不建议使用。但是实际添加过程中,插件会给文字设置默认字体,并且会加载这个字体资源,如图红色框起来的地方,就是字体:去掉的办法就是将这个字体换成inherit,这里的下拉框选择里面并没有,需要手动输入,如图:
-
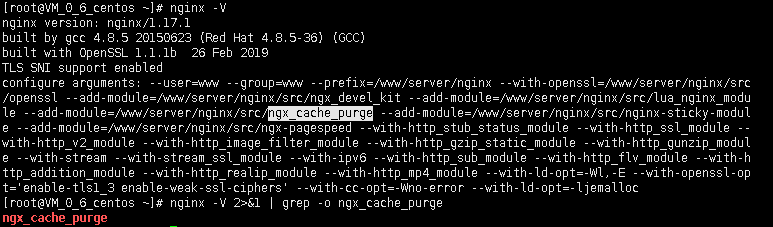
WordPress使用宝塔面板开启Nginx fastcgi_cache缓存加速 查看Nginx配置执行nginx -V 查看宝塔面板中Nginx的编译配置!执行以上命令后,我们可以看到宝塔Nginx已经编译了ngx_cache_purge 模块,那就很方便了!或者我们可以使用以下命令查看ngx_cache_purge 模块有没有编译安装:<span class="hljs-attr">nginx</span> <span class="hljs-string">-V 2>&1 | grep -o ngx_cache_purge 查看ngx_cache_purge是否安装,没有数据表示未安装</span> Nginx配置实例宝塔既然已经安装了此模块,那接下来我们就通过修改配置文件来启用此模块了!选择对应网站,点击设置,修改Nginx默认的配置文件!添加配置内容首先,我们需要在dev/shm/目录创建新文件夹,命名为nginx-cache(记住Nginx-cache)很重要!我们首先在对应网站的配置文件最开始的地方,也就是文件内容顶端输入以下内容:fastcgi_cache_key "$scheme$request_method$host$request_uri"; fastcgi_cache_path /dev/shm/nginx-cache levels=1:2 keys_zone=WORDPRESS:100m inactive=60m; fastcgi_cache_use_stale error timeout invalid_header http_500; fastcgi_ignore_headers Cache-Control Expires Set-Cookie;然后在server字段下添加如下内容,为了防止小白不清楚,技术宅这里指定下,大家在 #SSL-END下方添加如下内容:set $skip_cache 0; #post访问不缓存 if ($request_method = POST) { set $skip_cache 1; } #动态查询不缓存 if ($query_string != "") { set $skip_cache 1; } #后台等特定页面不缓存(其他需求请自行添加即可) if ($request_uri ~* "/wp-admin/|/xmlrpc.php|wp-.*.php|/feed/|index.php|sitemap(_index)?.xml") { set $skip_cache 1; } #对登录用户、评论过的用户不展示缓存 if ($http_cookie ~* "comment_author|wordpress_[a-f0-9]+|wp-postpass|wordpress_no_cache|wordpress_logged_in") { set $skip_cache 1; } #如果需要对所有用户缓存,请将以上代码改为下方的,两段代码只可任选其一 #if ($http_cookie ~* "comment_author|wordpress_[a-f0-9]+") { #set $skip_cache 1; #} #这里请参考你网站之前的配置,特别是sock的路径,弄错了就502了!关于sock,宝塔面板的在/www/server/php/72/etc/php-fpm.conf中有配置路径宝塔面板的sock location ~ [^/]\.php(/|$) { try_files $uri =404; fastcgi_pass unix:/tmp/php-cgi-72.sock; fastcgi_index index.php; include fastcgi.conf; add_header Strict-Transport-Security "max-age=63072000; includeSubdomains; preload"; #新增的缓存规则 fastcgi_cache_bypass $skip_cache; fastcgi_no_cache $skip_cache; add_header X-Cache "$upstream_cache_status From $host"; fastcgi_cache WORDPRESS; add_header Cache-Control max-age=0; add_header Nginx-Cache "$upstream_cache_status"; add_header Last-Modified $date_gmt; add_header X-Frame-Options SAMEORIGIN; # 只允许本站用 frame 来嵌套 add_header X-Content-Type-Options nosniff; # 禁止嗅探文件类型 add_header X-XSS-Protection "1; mode=block"; # XSS 保护 etag on; fastcgi_cache_valid 200 301 302 1d; } #缓存清理配置(可选模块,请细看下文说明) location ~ /purge(/.*) { allow 127.0.0.1; allow "服务器公网IP"; deny all; fastcgi_cache_purge WORDPRESS "$scheme$request_method$host$1"; }其中add_header Cache-Control如果是动态内容要实时更新的话,可以设置为0,否则可以设置时间大一些。然后安装WordPress插件!安装Nginx Helper插件置好了fastcgi_cache缓存之后,我们需要安装插件, fastcgi_cache 有一个量身定做的 WordPress 缓存清理插件:Nginx Helper。这个插件不定时更新,而且更新的很频繁。安装这个插件 ,非常简单,直接进入 WordPress 后台插件安装界面搜索 Nginx Helper 关键词在线安装即可。首先是开启purge,然后我们选择nginx Fastcgin cahe,因为就我们用就是这个缓存。之后选择 Delete local server cache files。当然第一个也可以用,但是一般推荐用Delete local server cache files,因为每个服务器的环境都不一样,缓存路径也会不尽相同就会导致插件无法找到缓存文件并删除!插件还提供了其它的一些设置,功能非常丰富,例如发表新文章、新评论时是否更新Nginx缓存等。因为技术宅是对所有人缓存,所以全选了,请根据自己的实际情况勾选!3.1清理模式选择清理模式还需要仔细说下。①、purge 模式这个模式需要保留上文 Nginx 配置中的 purge 清理路径,清理的时候会产生一个请求。出于安全考虑,一般 purge 都不会完全开放!只有特定的 IP 可以访问,所以,如果用了 CDN 的朋友,再使用模式一,则需要在服务器上的 /etc/hosts 中将网站域名解析为服务器真实 IP,以便插件直接请求 purge 路径,而不用走 CDN 节点,避免请求被拒绝。还是没搞懂的话就放弃这个模式吧!②、文件模式模式二是直接清理对应的缓存文件,不需要请求 purge 这个清理路径,所以使用模式二,不需要配置上文 Nginx 的 purge 规则(我个人推荐使用这个模式)。由于插件作者定义的缓存路径是 /var/run/nginx-cache ,而我们可能会根据服务器实际情况来自定义缓存路径,这样一来,缓存路径的不同就会导致插件无法找到缓存文件并删除!接下来我们需要添加以下代码到WordPress的wp-config.php文件中!define('RT_WP_NGINX_HELPER_CACHE_PATH','/dev/shm/nginx-cache'); 以上技术宅是将缓存文件配置在内存里的,毕竟内存OI比一般的普通磁盘要快很多呢!如果你有一块炒鸡厉害的磁盘,挂载目录为/data或者使用系统盘,那么就需要修改/dev/shm/nginx-cache为你的实际缓存磁盘!保存以上的内容,最好是重新启动下Nginx,这样我们的网站就成功实现了fastcgi_cache缓存加速!效果检测刷新页面,当前端页面出现如下图所示的HIT,即便是fastcgi_cache缓存加速成功配置!我们再查看/dev/shm/nginx-cache目录,会发现出现单个字母或者数字的文件夹!那就表示缓存生效了!
-
WordPress使用开启Nginx fastcgi_cache缓存加速 Nginx内置FastCgi缓存,但是不支持自动清除缓存。当你在Wordpress里面新建/修改一篇文章,或者访客提交评论的时候,自动清空相关的缓存是必要的!Nginx需要安装ngx_cache_purg+量身定做的WordPress缓存清理插件:Nginx Helper。安装Nginx ngx_cache_purge模块1)查看ngx_cache_purge是否安装nginx -V 2>&1 | grep -o ngx_cache_purge 显示ngx_cache_purge表示已经安装2)安装ngx_cache_purge模块《OneinStack》和《lnmp一键安装包》下安装ngx_cache_purge模块cd /root/oneinstack/src wget http://labs.frickle.com/files/ngx_cache_purge-2.3.tar.gz wget http://nginx.org/download/nginx-1.13.0.tar.gz #根据自己需要的nginx版本下载 tar xzf ngx_cache_purge-2.3.tar.gz tar xzf nginx-1.13.0.tar.gz cd nginx-1.13.0 nginx -V #查看nginx编译参数,最后加上--add-module=../ngx_cache_purge-2.3 ./configure --prefix=/usr/local/nginx --user=www --group=www \ --with-http_stub_status_module --with-http_v2_module --with-http_ssl_module \ --with-ipv6 --with-http_gzip_static_module --with-http_realip_module \ --with-http_flv_module --with-ld-opt=-ljemalloc \ --add-module=../ngx_cache_purge-2.3 make #编译 mv /usr/local/nginx/sbin/nginx{,_`date +%F`} #备份nginx cp objs/nginx /usr/local/nginx/sbin nginx -V 2>&1 | grep -o ngx_cache_purge # 显示ngx_cache_purge表示已经安装成功 Nginx配置建议将fastcgi_cache_path设置tmpfs内存中,操作系统不同tmpfs路径也不同,如下:CentOS:/dev/shm Ubuntu和Debian:/run/shm 修改nginx虚拟主机配置文件/usr/local/nginx/conf/vhost/domaini.conf:(仅供参考)fastcgi_cache_path /dev/shm/nginx-cache levels=1:2 keys_zone=WORDPRESS:100m inactive=60m; fastcgi_cache_key "$scheme$request_method$host$request_uri"; fastcgi_cache_use_stale error timeout invalid_header http_500; fastcgi_ignore_headers Cache-Control Expires Set-Cookie; server { listen 443 ssl http2; ssl_certificate /usr/local/nginx/conf/vhost/linuxeye_blog.crt; ssl_certificate_key /usr/local/nginx/conf/vhost/linuxeye_blog.key; ssl_ciphers "CHACHA20:GCM:HIGH:!DH:!RC4:!aNULL:!eNULL:!LOW:!3DES:!MD5:!EXP:!PSK:!SRP:!DSS"; ssl_session_cache shared:SSL:10m; ssl_session_timeout 10m; #ssl_stapling on; #ssl_stapling_verify on; resolver 8.8.8.8 8.8.4.4 valid=300s; resolver_timeout 5s; server_name blog.linuxeye.com; access_log /home/wwwlogs/blog_nginx.log combined; index index.html index.htm index.php; include wordpress.conf; root /home/wwwroot/blog; set $skip_cache 0; if ($request_method = POST) { set $skip_cache 1; } if ($query_string != "") { set $skip_cache 1; } if ($request_uri ~* "/wp-admin/|/xmlrpc.php|wp-.*.php|/feed/|index.php|sitemap(_index)?.xml") { set $skip_cache 1; } if ($http_cookie ~* "comment_author|wordpress_[a-f0-9]+|wp-postpass|wordpress_no_cache|wordpress_logged_in") { set $skip_cache 1; } location ~ [^/]\.php(/|$) { #fastcgi_pass remote_php_ip:9000; fastcgi_pass unix:/dev/shm/php-cgi.sock; fastcgi_index index.php; include fastcgi.conf; fastcgi_cache_bypass $skip_cache; fastcgi_no_cache $skip_cache; fastcgi_cache WORDPRESS; fastcgi_cache_valid 60m; } location ~ /purge(/.*) { allow 127.0.0.1; deny all; fastcgi_cache_purge WORDPRESS "$scheme$request_method$host$1"; } location ~ .*\.(gif|jpg|jpeg|png|bmp|swf|flv|ico)$ { expires 30d; access_log off; } location ~ .*\.(js|css)?$ { expires 7d; access_log off; } } 使nginx配置生效service nginx reload 重启系统后shm内存中nginx-cache文件夹会丢失,为了使重启生效(自动创建文件夹),修改/etc/init.d/nginx的make_dirs下一行(大概52行)添加:[ ! -d '/dev/shm/nginx-cache' ] && { mkdir /dev/shm/nginx-cache; chown -R ${user}.$user /dev/shm/nginx-cache; } 3. WordPress安装Nginx Helper插件 WordPress后台【插件】—【安装插件】搜索【Nginx Helper】安装即可。全部启用修改wordpress网站根目录wp-config.php添加如下行:define('RT_WP_NGINX_HELPER_CACHE_PATH','/dev/shm/nginx-cache');